Monday, August 19, 2013
美图秀秀简单制作水印 @ 10:00 PM
0 talkative person(s)
制作辛苦,请勿盗图文
1。新建画布
2。宽度高度按自己喜好设定,背景按透明
点击文字,输入静态文字
随自己喜好选择字体,颜色,大小
也可以按饰品,放自己喜欢的图案
完成后按1。保存
2。设定png格式,否则背景会是白色而不是透明
现在可以随意放水印在自己喜欢的图片了
打开你要的图片
按文字 - 导入模板 - 用户自定义
选刚刚做好的水印
以后就可以在文字-用户自定义里找到了
点它自动就会出现
随自己喜好设定位置,大小,透明度,旋转角度等等
完成后点击保存就可以了
示范图:
这篇是教大家怎么简单制作自己的水印罢了,如果想要一些特殊又漂亮的,建议大家还是找专业的人帮你们弄哦。
Labels: 教程
Thursday, December 8, 2011
自製隱藏內容的cbox皮膚、如何隱藏cbox內容 @ 5:30 PM
0 talkative person(s)
效果圖:
圖一是使用paint畫出來的邊框,背景不透明
圖二是使用Photoscape畫出來的邊框,背景透明
我比較建議使用Photoscape啦,
因為如果用paint加了一些效果的話背景本來是透明的也會變成不透明的。
想要下載Photoscape的朋友可以按
這裡
下面我用圖二的效果圖來示範代碼:
Cbox代碼:
<div style="TEXT-ALIGN: center; PADDING-BOTTOM: 0px; LINE-HEIGHT: 0pt; PADDING-LEFT: 0px; WIDTH: 250px; PADDING-RIGHT: 50px; BACKGROUND: url(http://i1123.photobucket.com/albums/l559/Isabella_En/cboxskin3.png) no-repeat left top; HEIGHT: 200px; PADDING-TOP: 80px; -moz-background-clip: -moz-initial; -moz-background-origin: -moz-initial; -moz-background-inline-policy: -moz-initial" id="cboxdiv"><div><div><iframe style=" id="cboxform" height="100" marginheight="2" src="
橙色ID" frameborder="0" width="200" name="cboxform" marginwidth="2" scrolling="no"></iframe></div></div></div>
Shoutmix代碼:
<div id="shoutmix" style="padding-top: 80px; padding-left: 10px; width: 250px; height: 200px; background: url(http://i1123.photobucket.com/albums/l559/Isabella_En/cboxskin3.png) no-repeat scroll left top transparent;" align="left" position: relative;>
<iframe title="isabella_en" src="http://www.shoutmix.com/?
ShoutmixID" width="230" height="103px" frameborder="0" scrolling="auto"style="filter:alpha(opacity=50);opacity:0.55;-moz-opacity:0.55;display:block; ">
</iframe><!-- End ShoutMix --></div>
橙色ID和ShoutmixID是什麽?請往下看。
下面開始製作皮膚過程。
1. 打開美圖秀秀,點擊新建
寬度隨你喜歡,高度最好別超過200 。
2. 添加字體和飾品。
3. 保存。記得如果背景透明的話要png格式。
4. 打開photoscape,添加邊框,紅框部份是線條類型。
5. 也可以添加一些線條,好了后按保存。
6. 你也可以用paint添加邊框和線條,但是背景會變成白色的。
最後把你完成的圖片上傳到
Photobucket或者
Imageshack獲取圖片Direct Link。
現在教你們如何隱藏cbox或shoutmix的內容。
隱藏Cbox內容:
在你的Cbox代碼里按Ctrl+F尋找iframe,
<div style="TEXT-ALIGN: center; PADDING-BOTTOM: 0px; LINE-HEIGHT: 0pt; PADDING-LEFT: 0px; WIDTH: 250px; PADDING-RIGHT: 10px; BACKGROUND: url(圖片DirectLink) no-repeat left top; HEIGHT: 200px; PADDING-TOP: 10px; -moz-background-clip: -moz-initial; -moz-background-origin: -moz-initial; -moz-background-inline-policy: -moz-initial" id="cboxdiv"><div><iframe style="id="cboxmain" height="230" marginheight="2" src="http://www3.cbox.ws/box/?boxid=3274125&boxtag=hy67r5&sec=main" frameborder="0" width="200" name="cboxmain" marginwidth="2"></iframe></div><div><iframe style=" id="cboxform" height="100" marginheight="2" src="橙色ID" frameborder="0" width="250" name="cboxform" marginwidth="2" scrolling="no"></iframe></div></div>
把灰色部份的刪掉,如圖。
劃綫部份的數字可以自行更改。
橙色ID是什麽?別著急,請往下看。
隱藏Shoutmix內容:
在你的Shoutmix代碼里按Ctrl+F尋找title,title後面的height調成103就可以了。
<div id="shoutmix" style="padding-top: 80px; padding-left: 10px; width: 250px; height: 200px; background: url(圖片Direct Link) no-repeat scroll left top transparent;" align="left" position: relative;>
<iframe title="isabella_en" src="http://www.shoutmix.com/?ShoutmixID" width="250" height="103px" frameborder="0" scrolling="auto"style="filter:alpha(opacity=50);opacity:0.55;-moz-opacity:0.55;display:block; "></iframe><!-- End ShoutMix --></div>
劃綫部份可以自行更改。
好了,有任何不明白的地方可以問我。
要轉載可以,不過要先問過我,
還有要貼上我的鏈接。
這是我辛辛苦苦寫出來的教程,絕不容許任何人抄襲。
Labels: 教程
如何自製Chatbox皮膚 @ 12:43 PM
0 talkative person(s)
其實製作Chatbox皮膚很容易,但需要耐心。
而寬度和高度需要依你的部落格來自定。
如果你想要放在sidebar的話,那你的chatbox皮膚絕對不能寬過Sidebar。
我製作chatbox skin的時候比較常用paint、美圖秀秀和photoscape
這裡我教你們最簡單的製作方法。
效果圖:
代碼例子:
Cbox代碼:
<div style="TEXT-ALIGN: center; PADDING-BOTTOM: 0px; LINE-HEIGHT: 0pt; PADDING-LEFT: 0px; WIDTH: 250px; PADDING-RIGHT: 10px; BACKGROUND: url(http://i1123.photobucket.com/albums/l559/Isabella_En/chatboxskin.png) no-repeat left top; HEIGHT: 400px; PADDING-TOP:80px; -moz-background-clip: -moz-initial; -moz-background-origin: -moz-initial; -moz-background-inline-policy: -moz-initial" id="cboxdiv"><div><iframe style="id="cboxmain" height="250" marginheight="2" src="
黃色ID" frameborder="0" width="240" name="cboxmain" marginwidth="2"></iframe></div><div><iframe style=" id="cboxform" height="90" marginheight="2" src="
橙色ID" frameborder="0" width="240" name="cboxform" marginwidth="2" scrolling="no"></iframe></div></div>
Shoutmix代碼:
<!-- Begin ShoutMix - http://www.shoutmix.com -->
<div id="shoutmix-dl-0306" style="padding-top: 75px;padding-left: 3px; width: 250px; height: 400px; background: url(http://i1123.photobucket.com/albums/l559/Isabella_En/chatboxskin.png) no-repeat scroll left top transparent;" align="left" position: relative;>
<iframe src="http://www.shoutmix.com/?
shoutmixID" width="240" height="320" frameborder="0" scrolling="auto"style="filter:alpha(opacity=50);opacity:0.55;-moz-opacity:0.55;display:block; "></iframe></div>
點擊圖片放大
1. 打開美圖秀秀,按新建,
寬度高度隨你喜歡,但要符合你的部落格。
2. 你會看到這個樣子。
3. 放些飾品或者文字下去。
4. 保存。
注:如果你要透明背景,記得要換去png格式。
而透明背景只能是靜態,動態就不能了。
5.打開photoscape,然後添加邊框
6. 最後保存,如果出現這個,就按No
然後上傳圖片到
Photobucket或者
ImageShack獲取direct link
然後取代我的代碼,請參考以下代碼。
Cbox代碼:
<div style="TEXT-ALIGN: center; PADDING-BOTTOM: 0px; LINE-HEIGHT: 0pt; PADDING-LEFT: 0px;
WIDTH: 250px; PADDING-RIGHT: 10px; BACKGROUND: url(
圖片direct link) no-repeat left top;
HEIGHT: 400px; PADDING-TOP:80px; -moz-background-clip: -moz-initial; -moz-background-origin: -moz-initial; -moz-background-inline-policy: -moz-initial" id="cboxdiv"><div><iframe style="id="cboxmain"
height="250" marginheight="2" src="
黃色" frameborder="0"
width="240" name="cboxmain" marginwidth="2"></iframe></div><div><iframe style=" id="cboxform"
height="90" marginheight="2" src="
橙色" frameborder="0"
width="240" name="cboxform" marginwidth="2" scrolling="no"></iframe></div></div>
Shoutmix代碼:
<!-- Begin ShoutMix - http://www.shoutmix.com -->
<div id="shoutmix-dl-0306" style="padding-top: 75px;padding-left: 3px; width: 250px; height: 400px; background: url(圖片direct link) no-repeat scroll left top transparent;" align="left" position: relative;>
<iframe src="http://www.shoutmix.com/?ShoutboxID" width="240" height="320" frameborder="0" scrolling="auto"style="filter:alpha(opacity=50);opacity:0.55;-moz-opacity:0.55;display:block; "></iframe></div>
上面劃綫部份的數字你可以自己更改,至於是用來幹什麼的,你自己研究。
黃色、橙色和藍色那些請參考
這裡
有些人會想要自己自製ChatboxSkin然後分享給網友,
但是你要記得附上代碼,因為別人根本就不知道你製作的寬度和高度,
怎麼用咧?
而隱藏內容的Cbox皮膚我會下次更新。
好了,有任何不明白的地方可以問我。
要轉載可以,不過要先問過我,
還有要貼上我的鏈接。
這是我辛辛苦苦寫出來的教程,絕不容許任何人抄襲。
Labels: 教程
Saturday, December 3, 2011
添加長條形Youtube Player @ 6:21 PM
0 talkative person(s)
頁面元素→添加小工具→HTML/Javascript
<center><embed src="http://www.youtube.com/v/
z9Pv7D-X9Hw&feature=related&autoplay=1&hl=en_US&color1=0x
FCDFFF&color2=
0xFCDFFF" type="application/x-shockwave-flash" allowscriptaccess="always" allowfullscreen="true" width="
200" height="
25"></embed></object></center>
過後就開始在youtube找你要放在部落格的歌
找到了就放進代碼里
看到紅框裡的字嗎?
紅色的字替換成類似框裡的那個就對了
藍色是youtube player 的邊框顏色
紫色的是youtube player的背景顏色
橙色的是長度和高度,可以自己調,數目越大就越長/高
顏色代碼按
這裡
當你把顏色代碼paste進上面的代碼以後,請把#符號拿掉,不然顏色會顯示不出來。
Labels: 教程
Tuesday, November 22, 2011
添加多功能標籤 Multi tab @ 2:37 PM
0 talkative person(s)
首先登入你的部落格,設計→ 修改HTML
Sign in blogger,design→ Edit HTML
Ctrl+F 尋找 </head>
Ctrl+F find </head>
把以下的代碼paste在它的前面
Copy and paste the HTML in front of it
<script type='text/javascript'>


//<![CDATA[


function tabtampil_oom(TPID, id)


{


var Tabtampil = document.getElementById(TPID);


var TTs = Tabtampil.firstChild;


while (TTs.className != "TTs" ) TTs = TTs.nextSibling;


var TT = TTs.firstChild;


var i   = 0;


do


{


if (TT.tagName == "A")


{


i++;


TT.href      = "javascript:tabtampil_ubah('"+TPID+"', "+i+");";


TT.className = (i == id) ? "Active" : "";


TT.blur();


}


}


while (TT = TT.nextSibling);


var Halamans = Tabtampil.firstChild;


while (Halamans.className != 'Halamans') Halamans = Halamans.nextSibling;


var Halaman = Halamans.firstChild;


var i    = 0;


do


{


if (Halaman.className == 'Halaman')


{


i++;


if (Halamans.offsetHeight) Halaman.style.height = (Halamans.offsetHeight-2)+"px";


Halaman.style.overflow = "auto";


Halaman.style.display  = (i == id) ? 'block' : 'none';


}


}


while (Halaman = Halaman.nextSibling);


}


function tabtampil_ubah(TPID, id) { tabtampil_oom(TPID, id);


}


function tabtampil_inisial(TPID) { tabtampil_oom(TPID,  1);


document.write('');}


//]]>


</script>
按預覽看有沒有問題,沒有的話就按保存。
Preview and save it if don't have any problem .
過後再按頁面元素→添加小工具→HTML/JavaScript
and then click page element→Add a Gadget→HTML/JavaScript
<style type="text/css">


div.TabTampil div.TTs


{height: 24px; overflow: hidden; }


div.TabTampil div.TTs a:hover, div.TabTampil div.TTs a.Active


{ background-color: #82CAFA; }


div.TabTampil div.Halamans


{ clear: both; border: 1px solid #000000; overflow: hidden; background-color:#ffffff;}


div.TabTampil div.Halamans div.Halaman


{ height: 100%; padding: 0px; overflow: hidden; }


div.TabTampil div.Halamans div.Halaman div.Alas


{ padding: 3px 5px; }


div.TabTampil div.TTs a


{ border-left:1px solid #000000; border-right:1px solid #000000; border-top:0px dashed #000000; border-bottom:0px dashed #000000; float: left;


display: block; width: 95px; text-align: center; vertical-align: middle; height: 24px; padding-top: 3px; text-decoration: none; font-family: "Arial", Serif;


font-size: 11px; font-weight: 900; color: #000000}


</style>


<form action="tabtampil.html" method="get">


<div id="TabTampil" class="TabTampil">


<div style="width: 300px;" class="TTs"> <a>标题1</a> <a>标题2</a> <a>标题3</a></div>


<div style="width: 300px; height: 300px;" class="Halamans">


<div class="Halaman">


<div class="Alas">


<br/>


内容1


</div>


</div>


<div class="Halaman">


<div class="Alas">


<br/>


内容2


</div>


</div>


<div class="Halaman">


<div class="Alas">


<br/>


内容3


</div>


</div>


</div>


</div>


</form>


<script type="text/javascript">tabtampil_inisial('TabTampil');</script>
 藍色
藍色的是選中標題的時候出現的顏色
青色是內容邊框的顏色
紅色是內容的背景顏色
紫色是標題的邊框顏色
橙色是標題的字體顏色
顏色代碼請按
這裡
標題只可以寫字,而
內容可以放code或者字
border是厚度,數字越大就越厚
solid 是線條類型,下面有其他的類型
只要把solid的字眼換取你要的字眼就可以了

Labels: 教程
Monday, November 7, 2011
Hello Kitty Chatbox 皮膚 @ 7:06 PM
0 talkative person(s)
第一次製作皮膚,不美的話請見諒 ><
在換皮膚前,我先教你們怎麼找到Cbox ID和Shoutmix ID吧。
首先,在你取得你的Chatbox code之後,
尋找類似下面的code,那就是你的Cbox ID 了。
copy起來,再放到我已經調好的Chatbox Skin就可以了。
箭頭指著的地方就是你的shoutbox ID啦~
也就是說,你登入shoutmix時填的Shoutbox ID哦!
好了,找到了你的ID后開始為你的chatbox穿上漂亮的衣服吧!
動態文字+白色背景:
Cbox用戶:
<div style="TEXT-ALIGN: center; PADDING-BOTTOM: 0px; LINE-HEIGHT: 0pt; PADDING-LEFT: 0px; WIDTH: 300px; PADDING-RIGHT: 0px; BACKGROUND: url(http://i1123.photobucket.com/albums/l559/Isabella_En/kitty_.gif) no-repeat left top; HEIGHT: 400px; PADDING-TOP: 90px; -moz-background-clip: -moz-initial; -moz-background-origin: -moz-initial; -moz-background-inline-policy: -moz-initial" id="cboxdiv"><div><iframe style="id="cboxmain" height="200" marginheight="2" src="
黄色" frameborder="0" width="290" name="cboxmain" marginwidth="2"></iframe></div><div><iframe style=" id="cboxform" height="100" marginheight="2" src="
橙色" frameborder="0" width="280" name="cboxform" marginwidth="2" scrolling="no"></iframe></div></div>
Shoutmix 用戶:
<!-- Begin ShoutMix - http://www.shoutmix.com -->
<div id="shoutmix-dl-0306" style="padding-top: 90px;padding-left: 9px; width: 300px; height: 400px; background: url(http://i1123.photobucket.com/albums/l559/Isabella_En/kitty_.gif) no-repeat scroll left top transparent;" align="left" position: relative;>
<iframe src="http://www.shoutmix.com/?
你的shoutboxID" width="280" height="300" frameborder="0" scrolling="auto"style="filter:alpha(opacity=50);opacity:0.55;-moz-opacity:0.55;display:block; "></iframe></div>
靜態文字+透明背景:
Cbox用戶:
<div style="TEXT-ALIGN: center; PADDING-BOTTOM: 0px; LINE-HEIGHT: 0pt; PADDING-LEFT: 0px; WIDTH: 280px; PADDING-RIGHT: 0px; BACKGROUND: url(http://i1123.photobucket.com/albums/l559/Isabella_En/Kitty3.png) no-repeat left top; HEIGHT: 400px; PADDING-TOP: 110px; -moz-background-clip: -moz-initial; -moz-background-origin: -moz-initial; -moz-background-inline-policy: -moz-initial" id="cboxdiv"><div><iframe style="id="cboxmain" height="200" marginheight="2" src="
黄色" frameborder="0" width="260" name="cboxmain" marginwidth="2"></iframe></div><div><iframe style=" id="cboxform" height="80" marginheight="2" src="
橙色" frameborder="0" width="260" name="cboxform" marginwidth="2" scrolling="no"></iframe></div></div>
Shoutmix用戶:
<!-- Begin ShoutMix - http://www.shoutmix.com -->
<div id="shoutmix-dl-0306" style="padding-top: 110px;padding-left: 9px; width: 280px; height: 300px; background: url(http://i1123.photobucket.com/albums/l559/Isabella_En/Kitty3.png) no-repeat scroll left top transparent;" align="left" position: relative;>
<iframe src="http://www.shoutmix.com/?你的shoutbox ID" width="260" height="270" frameborder="0" scrolling="auto"style="filter:alpha(opacity=50);opacity:0.55;-moz-opacity:0.55;display:block; "></iframe></div>
喜歡的話歡迎抱走哦~!
不過,拿走之後記得留言告訴我一聲哈!這是基本的禮貌哦!
還有,不能盜版哦!
Labels: 教程, 素材
❤ older posts /
Monday, August 19, 2013
美图秀秀简单制作水印 @ 10:00 PM
0 talkative person(s)
制作辛苦,请勿盗图文
1。新建画布
2。宽度高度按自己喜好设定,背景按透明
点击文字,输入静态文字
随自己喜好选择字体,颜色,大小
也可以按饰品,放自己喜欢的图案
完成后按1。保存
2。设定png格式,否则背景会是白色而不是透明
现在可以随意放水印在自己喜欢的图片了
打开你要的图片
按文字 - 导入模板 - 用户自定义
选刚刚做好的水印
以后就可以在文字-用户自定义里找到了
点它自动就会出现
随自己喜好设定位置,大小,透明度,旋转角度等等
完成后点击保存就可以了
示范图:
这篇是教大家怎么简单制作自己的水印罢了,如果想要一些特殊又漂亮的,建议大家还是找专业的人帮你们弄哦。
Labels: 教程
❤ older posts /
Thursday, December 8, 2011
自製隱藏內容的cbox皮膚、如何隱藏cbox內容 @ 5:30 PM
0 talkative person(s)
效果圖:
圖一是使用paint畫出來的邊框,背景不透明
圖二是使用Photoscape畫出來的邊框,背景透明
我比較建議使用Photoscape啦,
因為如果用paint加了一些效果的話背景本來是透明的也會變成不透明的。
想要下載Photoscape的朋友可以按
這裡
下面我用圖二的效果圖來示範代碼:
Cbox代碼:
<div style="TEXT-ALIGN: center; PADDING-BOTTOM: 0px; LINE-HEIGHT: 0pt; PADDING-LEFT: 0px; WIDTH: 250px; PADDING-RIGHT: 50px; BACKGROUND: url(http://i1123.photobucket.com/albums/l559/Isabella_En/cboxskin3.png) no-repeat left top; HEIGHT: 200px; PADDING-TOP: 80px; -moz-background-clip: -moz-initial; -moz-background-origin: -moz-initial; -moz-background-inline-policy: -moz-initial" id="cboxdiv"><div><div><iframe style=" id="cboxform" height="100" marginheight="2" src="
橙色ID" frameborder="0" width="200" name="cboxform" marginwidth="2" scrolling="no"></iframe></div></div></div>
Shoutmix代碼:
<div id="shoutmix" style="padding-top: 80px; padding-left: 10px; width: 250px; height: 200px; background: url(http://i1123.photobucket.com/albums/l559/Isabella_En/cboxskin3.png) no-repeat scroll left top transparent;" align="left" position: relative;>
<iframe title="isabella_en" src="http://www.shoutmix.com/?
ShoutmixID" width="230" height="103px" frameborder="0" scrolling="auto"style="filter:alpha(opacity=50);opacity:0.55;-moz-opacity:0.55;display:block; ">
</iframe><!-- End ShoutMix --></div>
橙色ID和ShoutmixID是什麽?請往下看。
下面開始製作皮膚過程。
1. 打開美圖秀秀,點擊新建
寬度隨你喜歡,高度最好別超過200 。
2. 添加字體和飾品。
3. 保存。記得如果背景透明的話要png格式。
4. 打開photoscape,添加邊框,紅框部份是線條類型。
5. 也可以添加一些線條,好了后按保存。
6. 你也可以用paint添加邊框和線條,但是背景會變成白色的。
最後把你完成的圖片上傳到
Photobucket或者
Imageshack獲取圖片Direct Link。
現在教你們如何隱藏cbox或shoutmix的內容。
隱藏Cbox內容:
在你的Cbox代碼里按Ctrl+F尋找iframe,
<div style="TEXT-ALIGN: center; PADDING-BOTTOM: 0px; LINE-HEIGHT: 0pt; PADDING-LEFT: 0px; WIDTH: 250px; PADDING-RIGHT: 10px; BACKGROUND: url(圖片DirectLink) no-repeat left top; HEIGHT: 200px; PADDING-TOP: 10px; -moz-background-clip: -moz-initial; -moz-background-origin: -moz-initial; -moz-background-inline-policy: -moz-initial" id="cboxdiv"><div><iframe style="id="cboxmain" height="230" marginheight="2" src="http://www3.cbox.ws/box/?boxid=3274125&boxtag=hy67r5&sec=main" frameborder="0" width="200" name="cboxmain" marginwidth="2"></iframe></div><div><iframe style=" id="cboxform" height="100" marginheight="2" src="橙色ID" frameborder="0" width="250" name="cboxform" marginwidth="2" scrolling="no"></iframe></div></div>
把灰色部份的刪掉,如圖。
劃綫部份的數字可以自行更改。
橙色ID是什麽?別著急,請往下看。
隱藏Shoutmix內容:
在你的Shoutmix代碼里按Ctrl+F尋找title,title後面的height調成103就可以了。
<div id="shoutmix" style="padding-top: 80px; padding-left: 10px; width: 250px; height: 200px; background: url(圖片Direct Link) no-repeat scroll left top transparent;" align="left" position: relative;>
<iframe title="isabella_en" src="http://www.shoutmix.com/?ShoutmixID" width="250" height="103px" frameborder="0" scrolling="auto"style="filter:alpha(opacity=50);opacity:0.55;-moz-opacity:0.55;display:block; "></iframe><!-- End ShoutMix --></div>
劃綫部份可以自行更改。
好了,有任何不明白的地方可以問我。
要轉載可以,不過要先問過我,
還有要貼上我的鏈接。
這是我辛辛苦苦寫出來的教程,絕不容許任何人抄襲。
Labels: 教程
❤ older posts /
如何自製Chatbox皮膚 @ 12:43 PM
0 talkative person(s)
其實製作Chatbox皮膚很容易,但需要耐心。
而寬度和高度需要依你的部落格來自定。
如果你想要放在sidebar的話,那你的chatbox皮膚絕對不能寬過Sidebar。
我製作chatbox skin的時候比較常用paint、美圖秀秀和photoscape
這裡我教你們最簡單的製作方法。
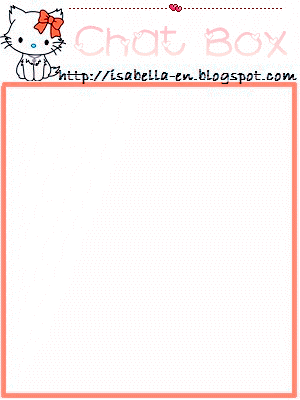
效果圖:
代碼例子:
Cbox代碼:
<div style="TEXT-ALIGN: center; PADDING-BOTTOM: 0px; LINE-HEIGHT: 0pt; PADDING-LEFT: 0px; WIDTH: 250px; PADDING-RIGHT: 10px; BACKGROUND: url(http://i1123.photobucket.com/albums/l559/Isabella_En/chatboxskin.png) no-repeat left top; HEIGHT: 400px; PADDING-TOP:80px; -moz-background-clip: -moz-initial; -moz-background-origin: -moz-initial; -moz-background-inline-policy: -moz-initial" id="cboxdiv"><div><iframe style="id="cboxmain" height="250" marginheight="2" src="
黃色ID" frameborder="0" width="240" name="cboxmain" marginwidth="2"></iframe></div><div><iframe style=" id="cboxform" height="90" marginheight="2" src="
橙色ID" frameborder="0" width="240" name="cboxform" marginwidth="2" scrolling="no"></iframe></div></div>
Shoutmix代碼:
<!-- Begin ShoutMix - http://www.shoutmix.com -->
<div id="shoutmix-dl-0306" style="padding-top: 75px;padding-left: 3px; width: 250px; height: 400px; background: url(http://i1123.photobucket.com/albums/l559/Isabella_En/chatboxskin.png) no-repeat scroll left top transparent;" align="left" position: relative;>
<iframe src="http://www.shoutmix.com/?
shoutmixID" width="240" height="320" frameborder="0" scrolling="auto"style="filter:alpha(opacity=50);opacity:0.55;-moz-opacity:0.55;display:block; "></iframe></div>
點擊圖片放大
1. 打開美圖秀秀,按新建,
寬度高度隨你喜歡,但要符合你的部落格。
2. 你會看到這個樣子。
3. 放些飾品或者文字下去。
4. 保存。
注:如果你要透明背景,記得要換去png格式。
而透明背景只能是靜態,動態就不能了。
5.打開photoscape,然後添加邊框
6. 最後保存,如果出現這個,就按No
然後上傳圖片到
Photobucket或者
ImageShack獲取direct link
然後取代我的代碼,請參考以下代碼。
Cbox代碼:
<div style="TEXT-ALIGN: center; PADDING-BOTTOM: 0px; LINE-HEIGHT: 0pt; PADDING-LEFT: 0px;
WIDTH: 250px; PADDING-RIGHT: 10px; BACKGROUND: url(
圖片direct link) no-repeat left top;
HEIGHT: 400px; PADDING-TOP:80px; -moz-background-clip: -moz-initial; -moz-background-origin: -moz-initial; -moz-background-inline-policy: -moz-initial" id="cboxdiv"><div><iframe style="id="cboxmain"
height="250" marginheight="2" src="
黃色" frameborder="0"
width="240" name="cboxmain" marginwidth="2"></iframe></div><div><iframe style=" id="cboxform"
height="90" marginheight="2" src="
橙色" frameborder="0"
width="240" name="cboxform" marginwidth="2" scrolling="no"></iframe></div></div>
Shoutmix代碼:
<!-- Begin ShoutMix - http://www.shoutmix.com -->
<div id="shoutmix-dl-0306" style="padding-top: 75px;padding-left: 3px; width: 250px; height: 400px; background: url(圖片direct link) no-repeat scroll left top transparent;" align="left" position: relative;>
<iframe src="http://www.shoutmix.com/?ShoutboxID" width="240" height="320" frameborder="0" scrolling="auto"style="filter:alpha(opacity=50);opacity:0.55;-moz-opacity:0.55;display:block; "></iframe></div>
上面劃綫部份的數字你可以自己更改,至於是用來幹什麼的,你自己研究。
黃色、橙色和藍色那些請參考
這裡
有些人會想要自己自製ChatboxSkin然後分享給網友,
但是你要記得附上代碼,因為別人根本就不知道你製作的寬度和高度,
怎麼用咧?
而隱藏內容的Cbox皮膚我會下次更新。
好了,有任何不明白的地方可以問我。
要轉載可以,不過要先問過我,
還有要貼上我的鏈接。
這是我辛辛苦苦寫出來的教程,絕不容許任何人抄襲。
Labels: 教程
❤ older posts /
Saturday, December 3, 2011
添加長條形Youtube Player @ 6:21 PM
0 talkative person(s)
頁面元素→添加小工具→HTML/Javascript
<center><embed src="http://www.youtube.com/v/
z9Pv7D-X9Hw&feature=related&autoplay=1&hl=en_US&color1=0x
FCDFFF&color2=
0xFCDFFF" type="application/x-shockwave-flash" allowscriptaccess="always" allowfullscreen="true" width="
200" height="
25"></embed></object></center>
過後就開始在youtube找你要放在部落格的歌
找到了就放進代碼里
看到紅框裡的字嗎?
紅色的字替換成類似框裡的那個就對了
藍色是youtube player 的邊框顏色
紫色的是youtube player的背景顏色
橙色的是長度和高度,可以自己調,數目越大就越長/高
顏色代碼按
這裡
當你把顏色代碼paste進上面的代碼以後,請把#符號拿掉,不然顏色會顯示不出來。
Labels: 教程
❤ older posts /
Tuesday, November 22, 2011
添加多功能標籤 Multi tab @ 2:37 PM
0 talkative person(s)
首先登入你的部落格,設計→ 修改HTML
Sign in blogger,design→ Edit HTML
Ctrl+F 尋找 </head>
Ctrl+F find </head>
把以下的代碼paste在它的前面
Copy and paste the HTML in front of it
<script type='text/javascript'>


//<![CDATA[


function tabtampil_oom(TPID, id)


{


var Tabtampil = document.getElementById(TPID);


var TTs = Tabtampil.firstChild;


while (TTs.className != "TTs" ) TTs = TTs.nextSibling;


var TT = TTs.firstChild;


var i   = 0;


do


{


if (TT.tagName == "A")


{


i++;


TT.href      = "javascript:tabtampil_ubah('"+TPID+"', "+i+");";


TT.className = (i == id) ? "Active" : "";


TT.blur();


}


}


while (TT = TT.nextSibling);


var Halamans = Tabtampil.firstChild;


while (Halamans.className != 'Halamans') Halamans = Halamans.nextSibling;


var Halaman = Halamans.firstChild;


var i    = 0;


do


{


if (Halaman.className == 'Halaman')


{


i++;


if (Halamans.offsetHeight) Halaman.style.height = (Halamans.offsetHeight-2)+"px";


Halaman.style.overflow = "auto";


Halaman.style.display  = (i == id) ? 'block' : 'none';


}


}


while (Halaman = Halaman.nextSibling);


}


function tabtampil_ubah(TPID, id) { tabtampil_oom(TPID, id);


}


function tabtampil_inisial(TPID) { tabtampil_oom(TPID,  1);


document.write('');}


//]]>


</script>
按預覽看有沒有問題,沒有的話就按保存。
Preview and save it if don't have any problem .
過後再按頁面元素→添加小工具→HTML/JavaScript
and then click page element→Add a Gadget→HTML/JavaScript
<style type="text/css">


div.TabTampil div.TTs


{height: 24px; overflow: hidden; }


div.TabTampil div.TTs a:hover, div.TabTampil div.TTs a.Active


{ background-color: #82CAFA; }


div.TabTampil div.Halamans


{ clear: both; border: 1px solid #000000; overflow: hidden; background-color:#ffffff;}


div.TabTampil div.Halamans div.Halaman


{ height: 100%; padding: 0px; overflow: hidden; }


div.TabTampil div.Halamans div.Halaman div.Alas


{ padding: 3px 5px; }


div.TabTampil div.TTs a


{ border-left:1px solid #000000; border-right:1px solid #000000; border-top:0px dashed #000000; border-bottom:0px dashed #000000; float: left;


display: block; width: 95px; text-align: center; vertical-align: middle; height: 24px; padding-top: 3px; text-decoration: none; font-family: "Arial", Serif;


font-size: 11px; font-weight: 900; color: #000000}


</style>


<form action="tabtampil.html" method="get">


<div id="TabTampil" class="TabTampil">


<div style="width: 300px;" class="TTs"> <a>标题1</a> <a>标题2</a> <a>标题3</a></div>


<div style="width: 300px; height: 300px;" class="Halamans">


<div class="Halaman">


<div class="Alas">


<br/>


内容1


</div>


</div>


<div class="Halaman">


<div class="Alas">


<br/>


内容2


</div>


</div>


<div class="Halaman">


<div class="Alas">


<br/>


内容3


</div>


</div>


</div>


</div>


</form>


<script type="text/javascript">tabtampil_inisial('TabTampil');</script>
藍色的是選中標題的時候出現的顏色
青色是內容邊框的顏色
紅色是內容的背景顏色
紫色是標題的邊框顏色
橙色是標題的字體顏色
顏色代碼請按
這裡
標題只可以寫字,而
內容可以放code或者字
border是厚度,數字越大就越厚
solid 是線條類型,下面有其他的類型
只要把solid的字眼換取你要的字眼就可以了
Labels: 教程
❤ older posts /
Monday, November 7, 2011
Hello Kitty Chatbox 皮膚 @ 7:06 PM
0 talkative person(s)
第一次製作皮膚,不美的話請見諒 ><
在換皮膚前,我先教你們怎麼找到Cbox ID和Shoutmix ID吧。
首先,在你取得你的Chatbox code之後,
尋找類似下面的code,那就是你的Cbox ID 了。
copy起來,再放到我已經調好的Chatbox Skin就可以了。
箭頭指著的地方就是你的shoutbox ID啦~
也就是說,你登入shoutmix時填的Shoutbox ID哦!
好了,找到了你的ID后開始為你的chatbox穿上漂亮的衣服吧!
動態文字+白色背景:
Cbox用戶:
<div style="TEXT-ALIGN: center; PADDING-BOTTOM: 0px; LINE-HEIGHT: 0pt; PADDING-LEFT: 0px; WIDTH: 300px; PADDING-RIGHT: 0px; BACKGROUND: url(http://i1123.photobucket.com/albums/l559/Isabella_En/kitty_.gif) no-repeat left top; HEIGHT: 400px; PADDING-TOP: 90px; -moz-background-clip: -moz-initial; -moz-background-origin: -moz-initial; -moz-background-inline-policy: -moz-initial" id="cboxdiv"><div><iframe style="id="cboxmain" height="200" marginheight="2" src="
黄色" frameborder="0" width="290" name="cboxmain" marginwidth="2"></iframe></div><div><iframe style=" id="cboxform" height="100" marginheight="2" src="
橙色" frameborder="0" width="280" name="cboxform" marginwidth="2" scrolling="no"></iframe></div></div>
Shoutmix 用戶:
<!-- Begin ShoutMix - http://www.shoutmix.com -->
<div id="shoutmix-dl-0306" style="padding-top: 90px;padding-left: 9px; width: 300px; height: 400px; background: url(http://i1123.photobucket.com/albums/l559/Isabella_En/kitty_.gif) no-repeat scroll left top transparent;" align="left" position: relative;>
<iframe src="http://www.shoutmix.com/?
你的shoutboxID" width="280" height="300" frameborder="0" scrolling="auto"style="filter:alpha(opacity=50);opacity:0.55;-moz-opacity:0.55;display:block; "></iframe></div>
靜態文字+透明背景:
Cbox用戶:
<div style="TEXT-ALIGN: center; PADDING-BOTTOM: 0px; LINE-HEIGHT: 0pt; PADDING-LEFT: 0px; WIDTH: 280px; PADDING-RIGHT: 0px; BACKGROUND: url(http://i1123.photobucket.com/albums/l559/Isabella_En/Kitty3.png) no-repeat left top; HEIGHT: 400px; PADDING-TOP: 110px; -moz-background-clip: -moz-initial; -moz-background-origin: -moz-initial; -moz-background-inline-policy: -moz-initial" id="cboxdiv"><div><iframe style="id="cboxmain" height="200" marginheight="2" src="
黄色" frameborder="0" width="260" name="cboxmain" marginwidth="2"></iframe></div><div><iframe style=" id="cboxform" height="80" marginheight="2" src="
橙色" frameborder="0" width="260" name="cboxform" marginwidth="2" scrolling="no"></iframe></div></div>
Shoutmix用戶:
<!-- Begin ShoutMix - http://www.shoutmix.com -->
<div id="shoutmix-dl-0306" style="padding-top: 110px;padding-left: 9px; width: 280px; height: 300px; background: url(http://i1123.photobucket.com/albums/l559/Isabella_En/Kitty3.png) no-repeat scroll left top transparent;" align="left" position: relative;>
<iframe src="http://www.shoutmix.com/?你的shoutbox ID" width="260" height="270" frameborder="0" scrolling="auto"style="filter:alpha(opacity=50);opacity:0.55;-moz-opacity:0.55;display:block; "></iframe></div>
喜歡的話歡迎抱走哦~!
不過,拿走之後記得留言告訴我一聲哈!這是基本的禮貌哦!
還有,不能盜版哦!
Labels: 教程, 素材
❤ older posts /


 New Blogskin
 New Android Phone